
So, here we go. Assuming you’ve downloaded the Windows App MeshChat from here, now we will set it up! Get ready, it’s going to be a heck of a ride. Oh, and if you can read you can set this up really easily. To preface one quick note, there are encryption keys that I have greyed out on the images that you will find here. Some of those codes you will need to be able to set up the propagation portion of the network, which is needed to “store” messages in case the devices aren’t online when you send a message. Those keys will be given to you via a more secure way so that you can enter them in the appropriate places as described below. But for now, let’s get started. WARNING: DO NOT USE MESHCHATX, this is NOT the one that we’re using, and I cannot vouch for the vetting of the program. It appears there are folks everywhere who like to use someone else’s name for an app to sow a little confusion. Get MeshChat from the above link, and hell, I’ll even put one HERE.
For Reticulum and MeshChat to work, there must be an interface of some sort. Interface simply means “method of connecting at the hardware level”. So, we can do this through the network card in your computer, a LoRa radio, an HF radio via AX.25, and many many other ways, depending upon the method you need or want to use. On with the installation of MeshChat.
You will see a box on the releases page that looks like this following the link(s) above (bearing in mind version numbers may increment if a later version is available.):
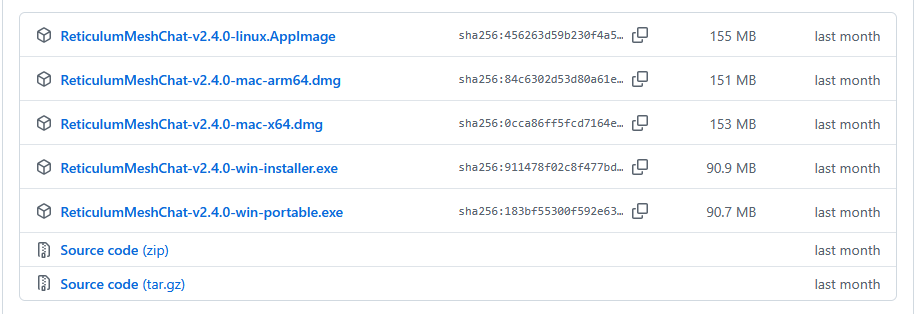
For this tutorial, I’m using the Windows version of the app, so setup of the others should be identical, but I can’t verify this, so for now, I hope you’re on a Windows machine. Download the FOURTH one down, ReticulumMeshChat-v2.4.0-win-installer.exe.
Go through the process of installing MeshChat. For those of you who aren’t familiar, Windows will often warn you of security risks. Accept the risks, and install MeshChat.
Once installed, start MeshChat and you should be ready to set things up so it will work with our network. I’ve named “our” network TheZoo2RetNet. For now, we’re going to concentrate on the TCP type connections, but I’ve successfully set up LoRa radios to work with this network. Meaning, I have a receiving radio on the server, and can send via LoRa radio directly in, and it distributes through the network to the proper places. Keep in mind, eventually we can use AX.25 to send REAL long range signals using other KISS programs like Dire Wolf, etc. which are common in the HAM radio world. This network is going to be fun to work with so hang with me. Back to the subject at hand. You should see a screen that looks similar to this when you start the MeshChat app. (Ignore the already set up stuff you see on my screen, yours won’t look exactly like this until we get you set up.)
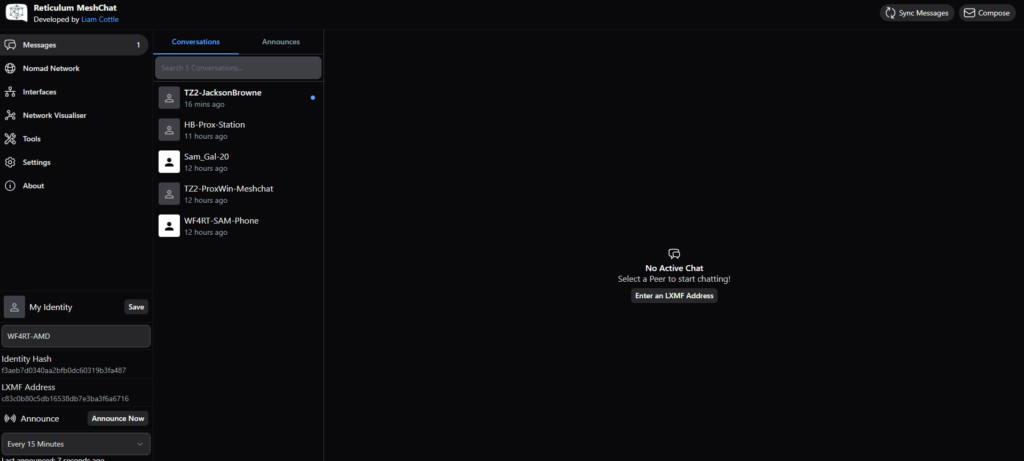
We will be using the left hand menu items to begin setting up your MeshChat to work with TheZoo2RetNet and in general.
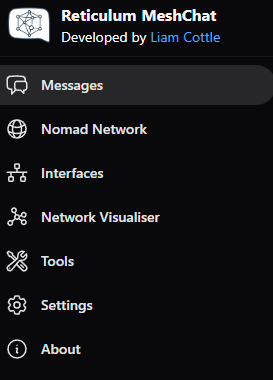
The first thing we’ll do is click on Interfaces. We are going to set up a TCP interface for you to connect to the “server” I have set up. Click on Interfaces and you should see the list of interfaces, which most likely be “Default Interface” for yours. Leave that interface alone, and we’ll click on Add Interface.

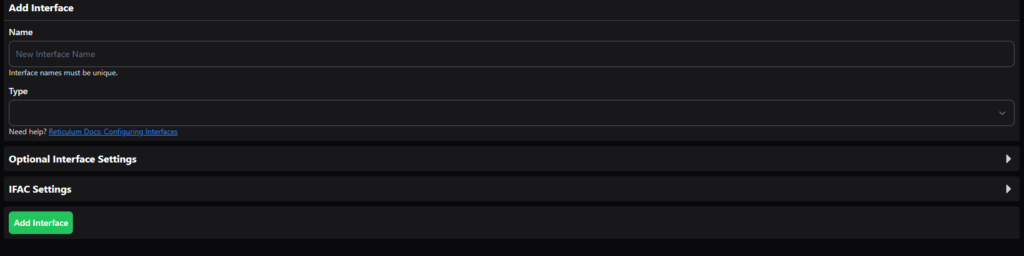
Clicking the “+ Add Interface” button brings up the above.
Enter “TheZoo2RetNet” into the Name field of the interface you’re building. Then click on the box under Type, and set that to “TCP Client Interface.” Once set to “TCP Client Interface, you will see “Target Host” and “Target Port” appear. We will enter the external IP for the “server” into the “Target Host” and port 4545 (yup, double the best caliber) into the “Target Port” box. It should look like the following. Click Add Interface.
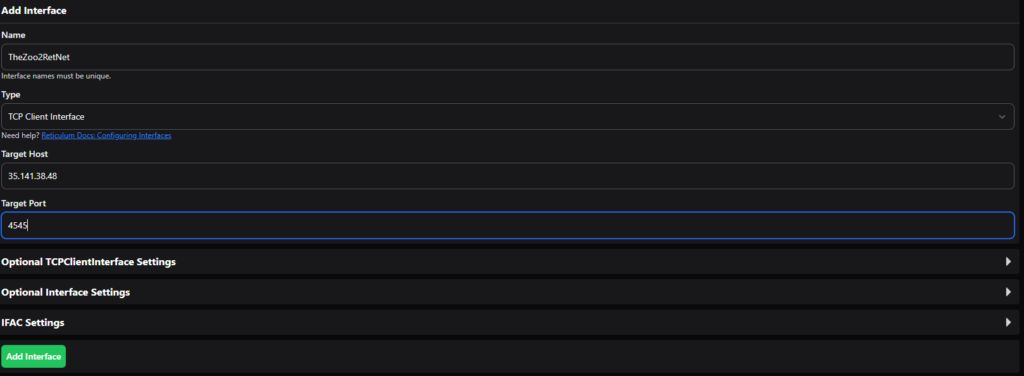
For that interface to work, you must restart MeshChat. For that matter, any interface that you add requires you to restart MeshChat every time you add one, so if you’ve set up an interface and can’t figure out why it isn’t working, try restarting MeshChat.
At this point, the Default Interface and the TheZoo2RetNet interface will work together to route traffic. The Default Interface is automatically set up when you install MeshChat and uses your networking on the device you’ve installed MeshChat on, so leave that one alone until we decide to change the method of sending stuffs. (A more advanced tutorial will be written.)
So, onward and upward.
Now that the interfaces are set up, we should work on changing the human friendly display name for the device you’re using. Assuming we don’t care if people know how to look us up on QRZ or the federal database, we can use our call signs. If we decide that we’d like to remain strictly anonymous, use something that isn’t necessarily easy for anyone to figure out your name etc. just in case. Every communication from and to MeshChat is encrypted, including the “name” that is used and sent, however, if you connect to a network outside of our control, you’ve given that information to whomever owns that network. Just keep this in mind.
On the lower left hand side of the MeshChat screen you should see the following, which should have populated with Anonymous Node or something similar.
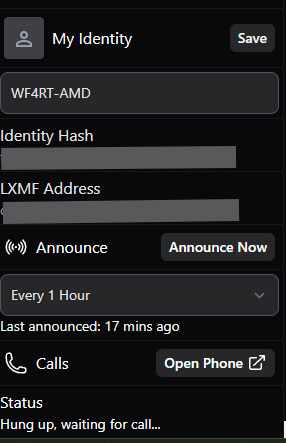
The Identity Hash and the LXMF Address boxes will be populated as well, based on the device you’re using, and the name, etc. Change the top box only, and click Save. You see I have 1 hour for Announce set here, however, I’ve since decided to do so every 15 minutes. This is for the device to automatically announce it’s presence on the network(s) that it is attached to. This doesn’t restrict you from clicking the Announce Now button any time you wish. Use the Announce Now button every time you connect to another network, or if you feel you should be seeing other “nodes” that you aren’t seeing. Once you’ve changed the display name in My Identity, we should head over to settings and click on the clicky points that need clicking. Click on Settings on the menu to the left. You should see a screen that looks similar to this, without some of the clicky things clicked to be activated. Activate them as you see below. (Note that you will have a populated encryption key in the Local Propagation Node box. Leave this be, do not change it. I will send you the actual propagation node information that will go into the Preferred Propagation Node box below that one so that your messages will be sent to the “storage” on the network pending the node you’re communicating with coming online.)
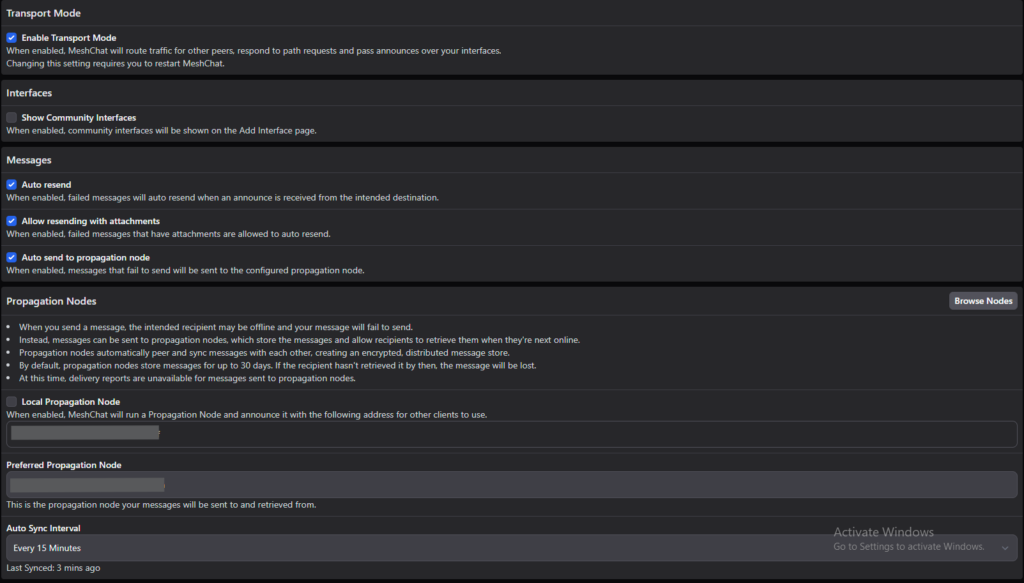
The “Auto Sync Interval” can be anything you’d like, but bear in mind that the more often you auto sync, the sooner you’ll get any messages sent to the propagation node for your device while you were offline. We can manually sync as well, which will be pointed to later. As the network grows, just know that the more we auto sync, etc. throughout the network, the more congested the network could become. Shouldn’t be an issue, but if we get HUGE it could be. Just saying. Also note that there isn’t really a consistent “Save” button for settings throughout the MeshChat. If you don’t see a “Save” button, it auto saves or leaves the settings that you set once you navigate away, so don’t sweat the small stuff.
Ok, so we have the Interface(s) set, we have the Identity of your node set, and we’ve just set up the way your MeshChat will act while on the network. What say we try to make your first communication attempt on the network?
Click on “Messages” on the left menu. Then click on “Announce Now”. You may see some nodes pop up (pending they are connected to the network when you announce) automatically, but you have to know where to look. You should see Conversations and Announces on your screen, similar to the following:

By default, Conversations will be “highlighted”. Click on Announces and you should see any node that has announced on the network. Most often when a node announces, the other nodes on the network will respond with “Yup, I’m here and hear you” type responses.
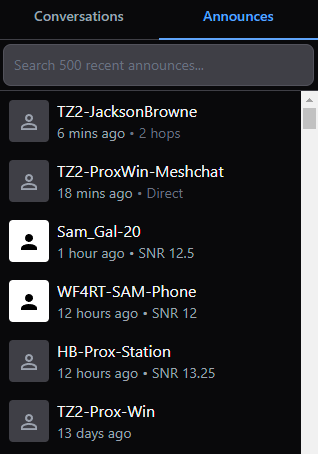
As you can see, I’ve set up a few devices on the network while testing. You may see some of these, or you may not. Eventually you should see them all as I continue to work out the network and play with setups. To send a message to one of the nodes, simply click on the node you want to send a message to. Conveniently, I’ve changed the name of one of the above to indicate it as the server. That is the one that will be our propagation node, and acts as the “hub” for TheZoo2RetNet. Cool, huh?
So, with that said, if we’ve set everything up properly, you should be able to click on, and send a “chat” or text message to the server. If I’m paying attention, I’ll respond. If you see any of the other nodes I’ve been playing with, you can feel free to message those too, and I’ll respond.
If you’re interested in how the “bubble map” looks, you can click on the Network Visualiser (sic) menu item on the left menu. This will show you all of the connections, how they’re connected, etc. of the network devices.
Anywho, we’ve just set up your Windows machine to use our TheZoo2RetNet to text each other, etc. Oh, did I mention?
If you’ve got a microphone and speaker attached to the device you’re connecting to our network with, you can use the Open Phone button to make a pseudo phone call in which everything is encrypted end to end. Even if intercepted, you won’t be heard without the decryption keys, so… This ties up quite a bit of bandwidth, so bear this in mind. But as long as you can see a device on the network, you can make a call to it. It just depends upon whether or not the other device has speakers, a mic, etc. The server does not, so… The cellular devices on the other hand? Yup…
If a device is setup to use an RNode (Radio Node, LoRa) the phone call will be limited to the ability of the LoRa device making solid connection, etc. during the call. We’ll set up a LoRa Interface in another tutorial. For now, let’s get TheZoo2RetNet on your device so that you somewhat understand what we’re doing.
Until next time
~73, WF4RT
 Meshchat for PC’s – Sideband for Androids